


| Tip: Successful Dash Kit Installations | |
Cleaning: It is important to make sure that the dash surface is clean, but also free from contaminants, such as Armor All® or other petroleum based products. Use a good de-greaser or solvent to ensure a clean surface. You can test a spot by using a piece of masking tape on the cleaned surface. If the tape does not stick well, it needs more cleaning (remember to re-clean the area you tested to make sure there is no residue left behind). Be sure to use clean, lint free cloths. Turn frequently to ensure use of clean areas of the cloth. We like to use a follow up step with rubbing alcohol and a clean cloth for good measure. Then we use a lint free cloth dampened with water and buff with a dry cloth to get ready for the primer. Primer: It is important to note that priming the dash surface does not replace cleaning it. Many of today's dashboards are made of plastics that are very slippery. Use of 3M Adhesive Promoter chemically modifies the dash surface and promotes a good bond with the 3M foam adhesive. When priming, apply one even coat and avoid building layers of primer, which can compromise the bond. Data Sheets on 3MTM Adhesive Promoter can be obtained from 3M customer service at 800-362-7183. |
|
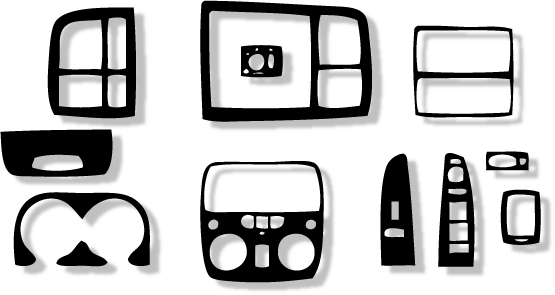
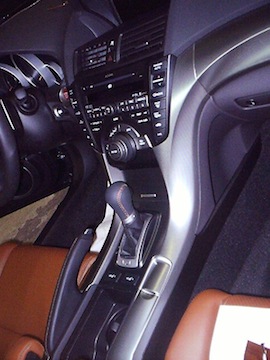
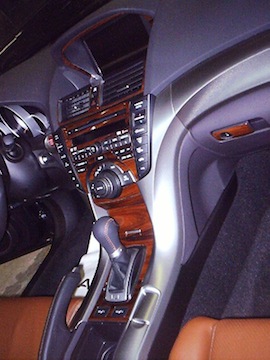
| DASH KIT INSTALLATION INSTRUCTIONS | |
A. ALIGNMENT- Always "dry fit" each piece before removing the masking from the 3M tape. Installation of a wood trim dash kit is an artistic process as opposed to a mechanical process. The mind's eye is critical to successful alignment during installation. The installer only has one chance to get it right, so be sure the alignment step has been precisely followed before removal of the protective masking from the adhesive surface. B. RECEIVING SURFACE PREPARATION- Cleaning the receiving surface properly is the most important step for successful installations. DO NOT CUT CORNERS. Failure to conform to these instructions will cause unsatisfactory results and will void the manufacturer's warranty. C. PRE-HEAT FOR WOOD FLEXIBILITY- Pre-heat instructions are outlined below. Follow the outlined steps in the order listed. 1. DENATURED ALCOHOL OR ISOPROPYL ALCOHOL- Available at any hardware store. Its purpose is to clean the receiving surface of the automobile. Be careful not to skip this step. 2. 3M 4298 ADHESIVE PROMOTER- Available with each kit is the hand wipe on sponge from the Manufacturer. The purpose of 3M 4298 Adhesive Promoter is to improve the adhesive bond of the 3M 4229 Tape Adhesive to the receiving surface. 3. After the wood trim kit is installed , clean the epoxy surface with Windex. Proper cleaning will remove prints, glue, etc., from the epoxy surface and provide a beautiful glossy luster finish for the wood trim package. 4. If these instructions are followed, the installer should have a successful installation. Improper installation creates problems that are destructive to your otherwise successful wood trim business. PRE-HEAT Pre-heat each piece prior to installation to a temperature between 85-90 degrees F. (no hotter than comfortable to the touch) which increases the wood kit flexibility. This allows for conformation to the shape of the contours of the receiving surface. Heat the wood trim piece with the use of a heat gun, heat lamp or by placing the pieces indirect sunlight under the windshield of the vehicle. In colder climates, the use of the vehicle defroster will expedite the process. |
|


SERVICE AREAS FOR DYE GUY INC. AUTOMOTIVE RESTORATION SERVICE
HOUSTON - PEARLAND - CYPRESS - SPRING - KATY - SUGARLAND - BELLAIRE
WEST UNIVERSITY PLACE -
SOUTH HOUSTON - MISSOURI CITY - DEER PARK
MISSION BEND - STAFFORD -
PASADENA - THE WOODLANDS - RICHMOND- ROSENBERG
.............................................................................